You want bathroom walls that look nice and stay strong. Now, more people pick bathroom wall panels instead of tiles for homes and businesses. The world market for bathroom wall panels is growing quickly. This is because they are easy to put in, simple to clean, and look good. Modern SPC wall panels keep out all water, are tough, and make bathroom walls look neat. TRIOFLOR’s SPC Wall Panels are a smart choice for your next bathroom job.
Bathroom wall panels keep water out. They are easy to clean. They look nice. They are easier to put up than tiles. They also need less work to take care of.
SPC and PVC panels work well in wet places. They do not let water in. They stop mold and stains. They are strong and last a long time.
You must get the wall ready first. Measure the space carefully. Use the right glue and sealant. This helps the panels stay tight and keep water out.
Clean the panels often with mild soap and water. Reseal the joints when needed. This keeps the panels looking good for many years.
Pick panels that match your bathroom’s moisture, style, and budget. This gives you a nice wall that lasts and keeps your home safe.

You want your bathroom to stay clean, dry, and stylish. Bathroom wall panels give you many advantages over traditional tiles. These panels are a waterproof alternative to tiles, so you do not have to worry about water or moisture damaging your walls. Unlike tiles, which have grout lines that collect dirt and mold, bathroom wall panels have smooth, seamless surfaces. You can wipe them clean with a cloth, and you do not need to scrub grout or worry about mildew. This makes them a great choice for busy families and commercial spaces.
Bathroom wall panels also save you time during installation. You can cut panels with simple tools and fit them directly over existing walls, even over old tiles. You do not need to use messy grout or special equipment. Many homeowners and property managers choose waterproof bathroom wall panels because they last a long time and need very little care. You get a modern look and a surface that resists stains, chips, and moisture.
Tip: Panels are non-porous, so they keep out water and stop leaks. This helps protect your bathroom walls from damage.
When you pick bathroom wall materials, think about where you will use them. Bathrooms have lots of moisture, so you need materials that are waterproof and mold-resistant. If your bathroom gets a lot of use, choose panels that are strong and easy to clean. Look for bathroom wall panels that match your style and fit your budget. Some materials, like PVC and SPC, work well in high-traffic or humid spaces because they resist knocks and stains.
You should also think about how easy the installation will be. Some panels are made for DIY projects, while others may need a professional. Make sure the panels you choose are easy to fit and seal, so your bathroom stays dry and safe. Regular cleaning with mild products will help your waterproof wall panels last even longer.
If you want a reliable solution, TRIOFLOR’s 100% waterproof SPC Wall Panels offer strong protection, easy installation, and a stylish finish for any bathroom.
Picking the right bathroom wall panels matters for style and use. There are many choices, and each has special features for your bathroom. Let’s look at the most common types and see how they are different.
SPC wall panels are a top pick for new bathrooms. TRIOFLOR’s SPC Wall Panels have a stone plastic composite core. This core mixes limestone powder and PVC. These panels are 100% waterproof, so they work well in wet places like bathrooms and kitchens. They also have a fire-retardant surface with a B-level rating. This helps keep your home or business safe. The panels do not get damaged easily, so walls stay nice even in busy spots.
You can put these panels up fast and without mess. The big panels join together tightly, so dirt and water stay out. You just glue them to a solid wall, which makes the job easy. TRIOFLOR’s panels come in many colors and finishes. You can match any bathroom style. Because they are waterproof and simple to clean, they are a smart buy for bathrooms.
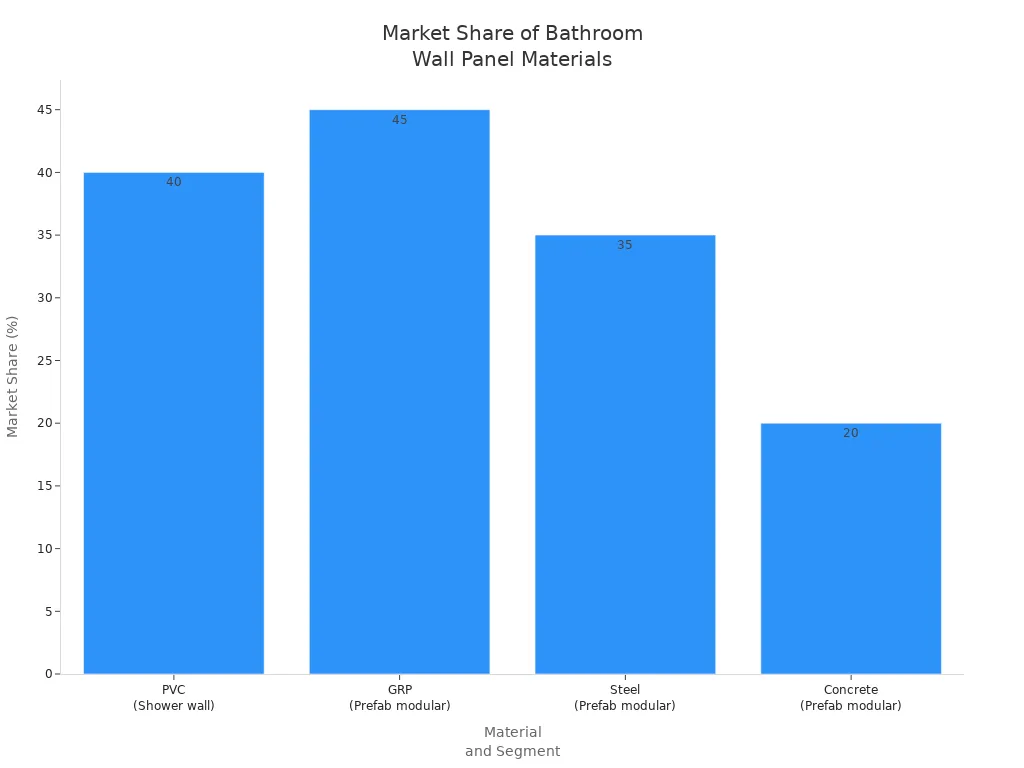
PVC bathroom wall panels are also a popular choice. These panels are light and easy to move, so they are good for DIY jobs. You can put pvc shower wall panels over old tiles with glue. This saves you time and money. PVC panels make up about 40% of the shower wall panel market.
PVC panels keep out water and handle humidity well.
Their tongue-and-groove design makes a smooth surface that stops mold.
They meet FDA hygiene rules and often have coatings that fight germs.
PVC panels can last a long time, sometimes up to 100 years.
Cleaning is easy. You only need mild soap and water.
PVC panels cost less and come in lots of styles. But they are thinner than SPC panels and may not be as strong in busy areas.
Acrylic wall panels give bathrooms a shiny, modern look. These panels are smooth and do not let stains, mold, or mildew stick. Cleaning acrylic wet wall panels is easy. Just use mild soap and water. Acrylic panels do not chip, crack, or lose color easily. Your bathroom walls stay bright and fresh.
Acrylic wall panels are waterproof and protect walls from water.
They do not get damaged by chemicals or turn yellow in sunlight.
You can use them for shower walls or as accent walls.
Acrylic panels are harder to scratch or chip than fiberglass. Some people think they do not look as natural as stone or tile.
Laminate wall panels and MDF panels come in many styles and cost less than some other choices. Laminate panels have a pretty layer on top of a core, often MDF. These panels are easy to clean and put up. Painted MDF does not cost much and works well in dry places like wainscoting.
Material Type | Cost Range (USD) | Notes |
|---|---|---|
FRP/Fiberglass Panels | $200 - $450 | Cheapest option, good for wet places like shower stalls |
Laminated Panels | Up to $2,000 | Includes laminated MDF, costs from middle to high |
Solid Surface Panels | Up to $2,000 | Premium choice, costs more than laminate and MDF |
Natural Stone Panels | Much higher | Luxury choice, can cost four times more than solid surface, needs pro installation |
MDF Panels | Middle price | Painted MDF is cheap and good for dry places like wainscoting |
Laminate panels are not fully waterproof, so use them in places with little moisture. If you want waterproof panels, pick SPC or PVC.
Fiberglass panels are light, cheap, and easy to put up. They keep out water and mold because of their gel-coat finish. But fiberglass can fade, crack, or change color over time. Solid surface panels are stronger and made from better materials. They keep out water, hits, and stains. Their smooth surface stops mold and mildew, so they are great for wet wall panels in bathrooms.
Solid surface panels last longer than fiberglass.
They fight germs and do not scratch or lose color easily.
You can use them for shower walls or full bathroom walls.
Wood and stone panels make bathrooms look special and fancy. Wood paneling adds warmth and texture, which is good for rustic or classic styles. You can paint or stain wood to fit your taste. But wood needs sealing to stop water damage. It is not the best for bathrooms with lots of moisture unless there is good airflow.
Natural stone panels look fancy and last a long time. Each panel has its own pattern and color. Stone panels add value to your home and work well for shower walls if you use a waterproof base. Stone is heavy and costs more. You must seal it often to stop stains and water problems.
Material | Pros | Cons |
|---|---|---|
Wood Paneling | Adds warmth and texture; fits classic/rustic styles; you can paint or stain | Needs sealing to stop water damage; not good for high humidity without airflow |
Natural Stone | Looks fancy with unique patterns; very strong; adds home value | Needs sealing to stop stains and water; costs more; heavy, may need strong walls |
There are many bathroom wall panel choices. Each type has good points and best places to use. Here is a quick chart to help you pick:
Material | Waterproof | Fire Resistance | Durability | Cost | Best Use Cases |
|---|---|---|---|---|---|
SPC | Yes | High | Very High | Medium | Bathrooms, kitchens, businesses |
PVC | Yes | Medium-High | High | Low | Shower walls, DIY, wet places |
Acrylic | Yes | Medium | Medium | Medium | Showers, accent walls |
Laminate/MDF | No | Medium | Medium | Medium | Dry places, wainscoting |
Fiberglass | Yes | Medium | Medium | Low | Shower stalls, budget projects |
Solid Surface | Yes | High | Very High | High | Fancy bathrooms, wet places |
Wood | No | Low | Medium | Medium | Dry, airy bathrooms |
Stone | Yes | High | Very High | High | Fancy bathrooms, feature walls |
SPC wall panels are waterproof, fire-resistant, and easy to install. PVC panels are the most used for shower walls, but SPC panels are stronger and have more style choices. Acrylic wall panels are easy to clean and do not stain, but may not look as real as stone or wood. Laminate wall panels and MDF cost less but are not waterproof, so use them in dry places. Fiberglass is cheap but does not last as long as solid surface panels. Wood and stone look fancy and warm but need extra care.

Installing bathroom wall panels gives you a fresh, clean look and protects your walls from water and stains. You can follow these steps to make sure your installation goes smoothly and your bathroom stays dry and safe.
You need to prepare your walls before you start. Good preparation helps your panels stick well and last longer.
Clean your walls. Remove dust, grease, and old adhesive.
Make sure your walls are waterproof, dry, level, and straight.
Fix any uneven spots by planing or shimming studs.
Remove loose tiles and sand glossy tiles if you install over old tiles.
Install a base profile with sealant behind it and screw it about 0.4 inches from the floor.
Add sealant between the base profile and the wall panel, and between the floor and the base profile. Wipe off extra sealant.
Prepare the shower pan and install a wood furring strip over the flange. Secure it to the studs.
Attach the metal base profile with sealant and screws through the wood strip and studs.
Seal corners and edges with sealant. Clean off extra sealant.
Use construction-grade adhesive, double-sided foam tape, and expansion screws for sturdy fitting.
Make sure the back wall is waterproof, clean, and level. Use OSB, plaster, sheetrock, greenboard, steel studs, concrete, or old tiles as a base.
Tip: Careful wall preparation helps prevent leaks and keeps your bathroom looking new.
You need the right tools and materials for a successful installation. Here is a table showing common panel types and costs, plus the tools you may need:
Panel Type | Average Cost Range | Description / Notes |
|---|---|---|
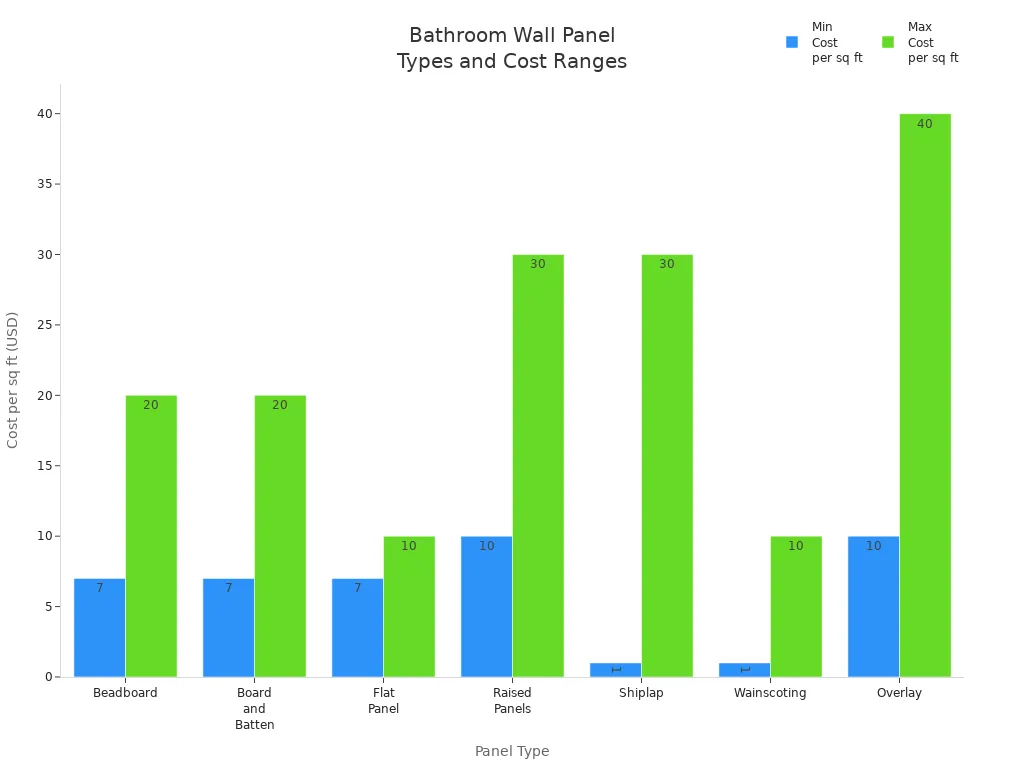
Beadboard | $7 – $20 | Vertical wood planks with grooves; used for wainscoting or full wall coverage. |
Board and Batten | $7 – $20 | Vertical molding on flat panels; labor-intensive due to measuring and fitting. |
Flat Panel | $7 – $10 | Simple, modern design without ornamentation; easier to install. |
Raised Panels | $10 – $30 | Beveled middle panel within a larger frame; more decorative. |
Shiplap | $1 – $30 | Horizontal or vertical panels adding texture; cost varies with material. |
Wainscoting | $1 – $10 | Combination of panel styles, usually covering lower half of wall. |
Overlay | $10 – $40 | Decorative moldings added to existing panels; most expensive and ornate. |
Carpenters charge $75 to $125 per hour. You can save money by installing panels yourself if you have the right skills and tools. You need cutting tools, adhesives, measuring tape, level, screws, and sealant. Use sharp saws for clean cuts and construction adhesive for strong bonds.
You want your bathroom wall panels to fit tightly and look smooth. Follow these steps for a secure and watertight installation:
Dry-fit your panels first. Check the fit and trim edges with a track saw or circular saw.
Clean the back of each panel with denatured alcohol.
Apply adhesive in a 1/4-inch bead every 10-12 inches on the back.
Press the first panel into place. Use color-matched seam sealer on the tongue joint.
Install the next panel tightly. Use suction cups or get help for large panels.
Wipe off extra seam sealer with denatured alcohol.
Use bracing boards if the adhesive does not hold panels securely.
Measure and cut holes for fixtures with a jigsaw or hole saw.
Install side panels the same way. Trim as needed and seal tongue-and-groove joints.
Apply seam sealer or caulk to corners and joints for a watertight seal.
For outside corners, use bullnose edges or aluminum trim with construction adhesive.
Note: Always measure carefully and cut panels precisely to avoid gaps and misalignment.
Sealing your bathroom wall panels keeps water out and protects your walls. SPC and PVC panels use special systems to make sealing easy.
Use manufacturer-recommended adhesives or click-lock systems for SPC and PVC panels.
Leave small expansion gaps to allow for temperature changes.
Seal corners and joints with waterproof trims or silicone sealant, especially in wet wall panels and shower wall panels.
The AquaGuard click-lock system in SPC panels creates a waterproof seal between panels, so you do not need grout.
Apply sealant to all joints, corners, and edges. Clean off extra sealant for a neat finish.
Tip: Proper sealing prevents leaks and mold, keeping your bathroom safe and clean.
Avoid these mistakes to get the best results from your installation:
Choosing the wrong panels. Pick moisture-resistant panels for bathrooms and wet wall panels.
Not preparing the surface. Clean, dry, and level your walls before installing panels.
Incorrect measuring and cutting. Measure multiple times and use sharp tools for clean cuts.
Using the wrong adhesive. Use adhesives recommended by the panel manufacturer.
Ignoring expansion gaps. Leave about 1/8 inch between panels and edges to prevent warping.
Skipping waterproofing. Use waterproof backer boards and seal all joints and corners.
Poor ventilation. Make sure your bathroom has good airflow to reduce moisture buildup.
Alert: Rushing the installation can lead to leaks, mold, and panel failure. Take your time and follow each step carefully.
You can install bathroom wall panels quickly and cleanly if you follow these steps. SPC and PVC panels, like TRIOFLOR’s 100% waterproof SPC Wall Panels, make the job easier and give you a watertight seal. These panels protect your walls, resist stains, and keep your bathroom looking great for years.